Sync your Obsidian Vault on iOS with GitHub, Working Copy, and Apple Shortcuts
February 20th, 2023
(24-minute read)
Introduction
Obsidian is my favorite note-taking app. Since I started using it in 2021, I've been stuffing my vault full of notes, ideas, and reminders.
At first, I was only using Obsidian on my MacBook. But I quickly realized that I needed a way to capture my thoughts while I was on the go and away from my computer. Luckily, there's an Obsidian app that works on both iOS and iPad. But Obsidian works with local Markdown files. How do you connect multiple devices to the same Obsidian vault?
The Obsidian team offers a product called Obsidian Sync, which is a monthly or annual subscription that you can use to sync your vaults across devices. If you're not comfortable with Git, Obsidian Sync is a great way to get the same functionality while also supporting the Obsidian creators!
But for developers (or folks who would rather avoid paying for another monthly subscription), you can achieve a similar result using a GitHub repo, an app called Working Copy, and the built-in Shortcuts app on your Apple device.
In this post, I'll show you how to synchronize your Obsidian vault across Apple devices so that you can easily take notes wherever you are.
Prerequisites
Before you begin this tutorial, you should have the following materials:
- ✅ An existing Obsidian vault, backed up to a GitHub repository
- On my MacBook, I use the obsidian-git plugin, which I've configured to back up my vault every 30 minutes.
- ✅ An iPhone or iPad, with the following applications installed:
- ✅ Obsidian
- ✅ Working Copy: a Git client for working with repositories from a mobile device
- You'll need to upgrade to the Pro version, which you can do from within the app.
- ✅ Shortcuts: an Apple app for creating automations on your device
- (As of iOS/iPadOS 13+, the Shortcuts app comes pre-installed as a default app on your device.)
The Big Picture
Let's take a step back to understand the overall setup you'll be building:
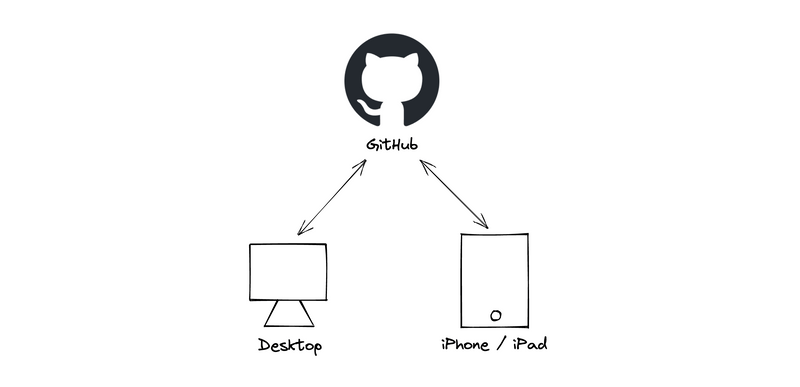
Your GitHub repo will be the source of truth for your vault. You'll want to make sure any changes you make to your local Obsidian vault get pushed to GitHub so that they can be accessed from your other devices.
Now let's zoom in a bit and take a closer look at the tools we'll use to enable this setup:
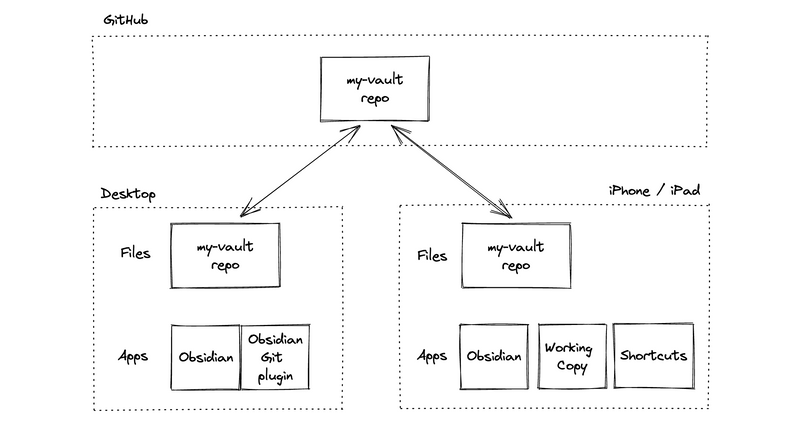
Expand for detailed image description
GitHub:
- Has a repo called "my-vault"
Desktop:
- Stores files in a local copy of the "my-vault" repo
- Uses the Obsidian application, with the Obsidian Git plugin
iPhone/iPad:
- Stores files in a local copy of the "my-vault" repo
- Uses the Obsidian, Working Copy, and Shortcuts applications
For the rest of this post, we'll focus on the iPhone/iPad setup.
Scenarios
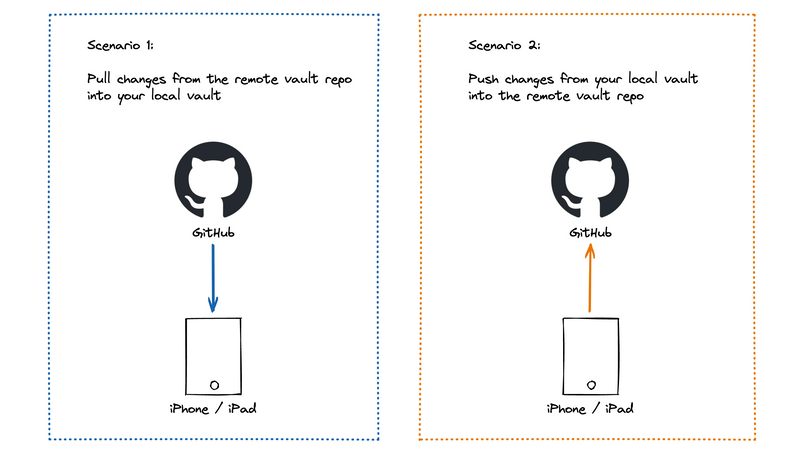
In order to keep your Obsidian vault synchronized with your iPhone or iPad, you'll need to handle the two following scenarios:
- Pull changes from the remote vault repo on GitHub into the local vault on your device.
- This syncs any changes you've made to your notes from another device.
- Push changes from the local vault on your device into the remote vault repo on GitHub.
- This makes changes from your iPhone/iPad available on other devices.
Let's get started!
1) Connect your local Obsidian vault to the GitHub repo
First things first, you'll need to create a new empty Obsidian vault on your iPhone/iPad.
-
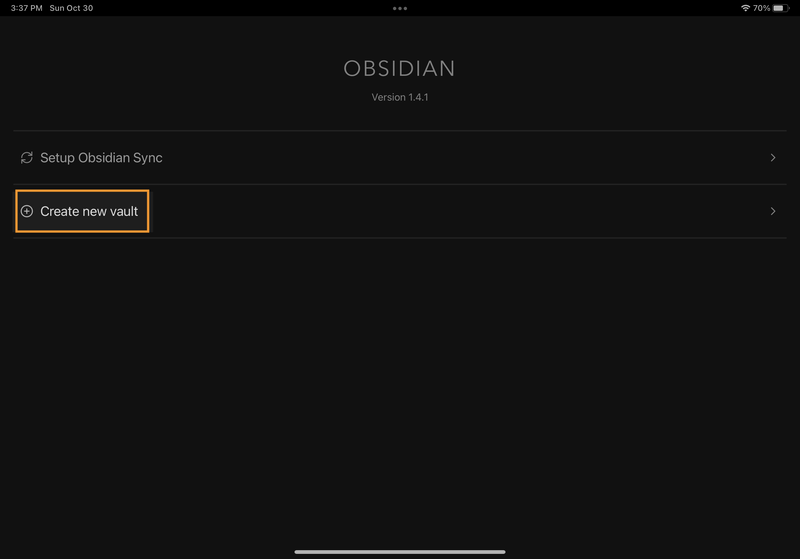
Open the Obsidian app on your device. Select "Create new vault".
-
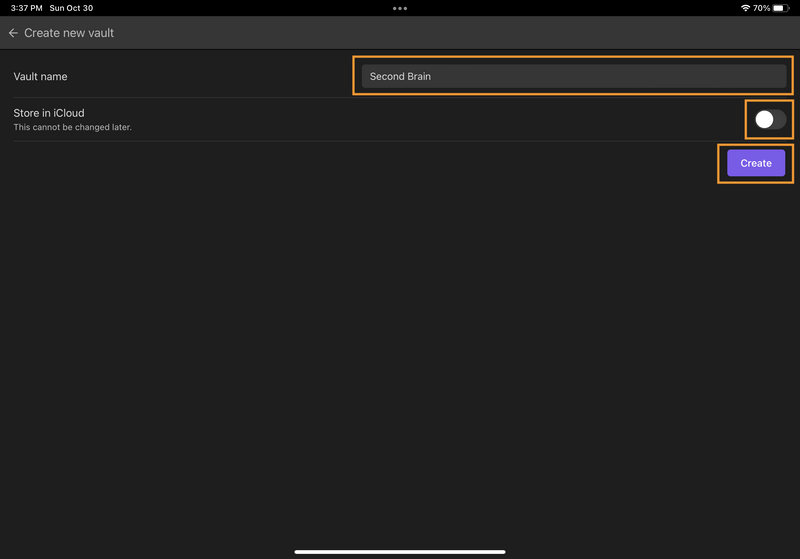
Give your vault a name. (I call mine "Second Brain".) Leave the "Store in iCloud" setting turned off. Then click "Create".
-
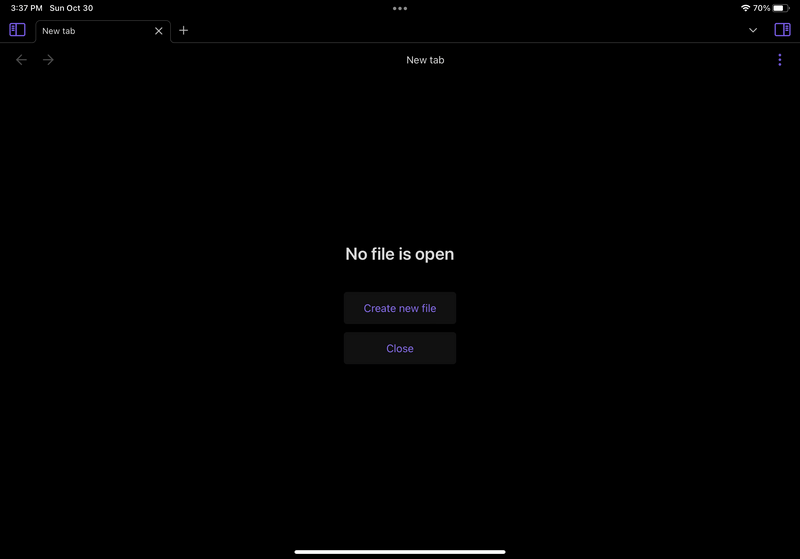
A new empty vault will be created on your device.
Next, use Working Copy to connect this new empty vault to your existing vault repo on GitHub.
-
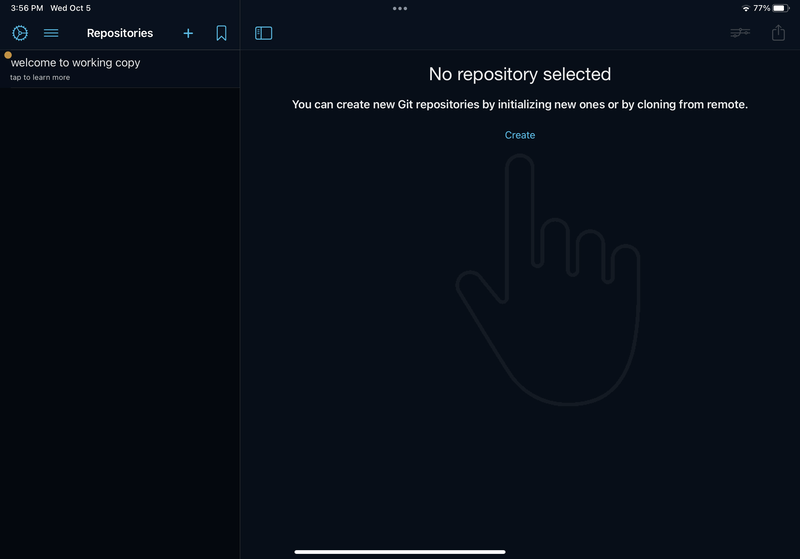
Open the Working Copy app on your device. The first time you load Working Copy, it will look something like this:
-
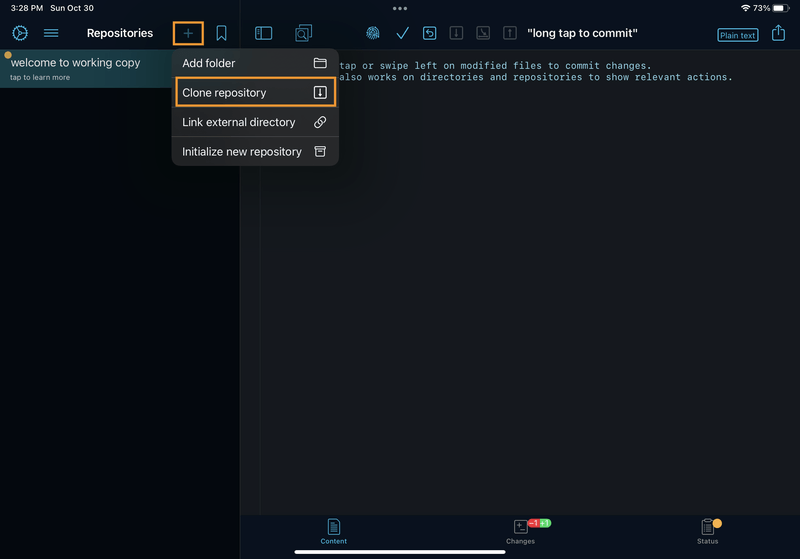
Click the "+" icon in the sidebar, then select "Clone repository".
-
Open the "GitHub" tab, then click "Sign In".
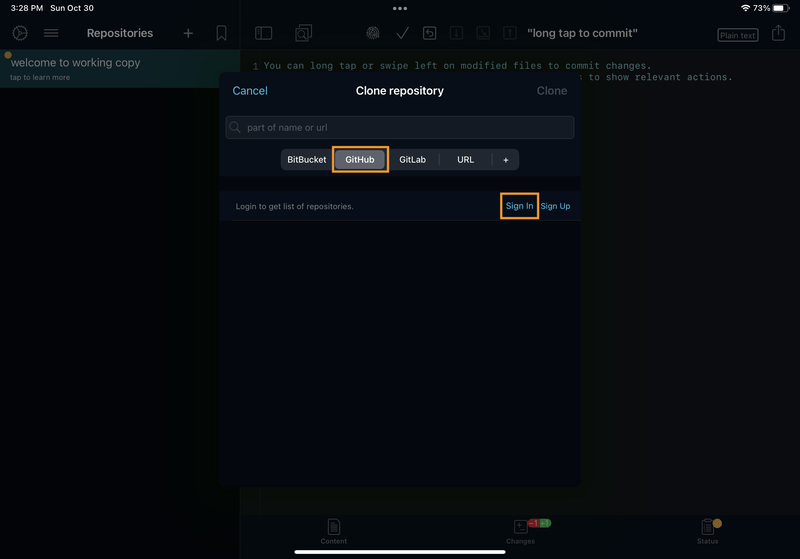
-
Enter your GitHub credentials to give Working Copy access to your repositories.
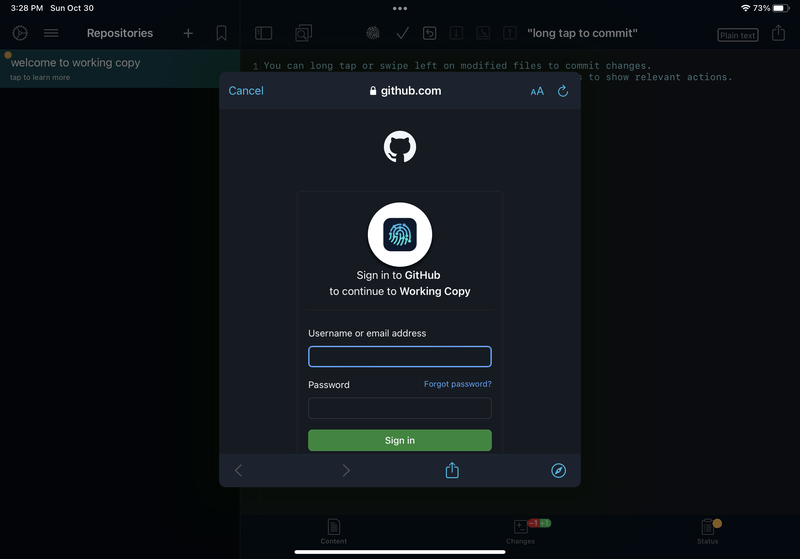
-
Now, Working Copy should display a list of your GitHub repositories. Locate and click on the one for your existing Obsidian vault.
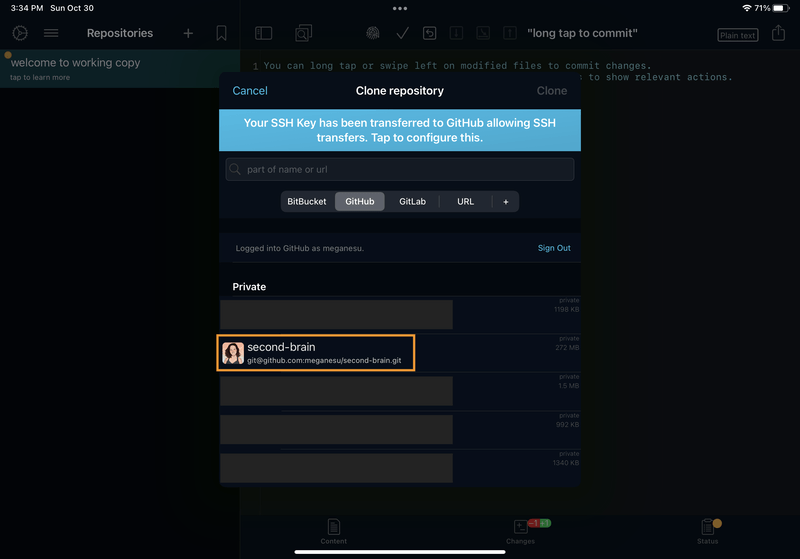
-
If you want, you can configure the settings for cloning the repo, but I kept the default settings. Then click "Clone". This will download a copy of your existing vault repo from GitHub to your device.
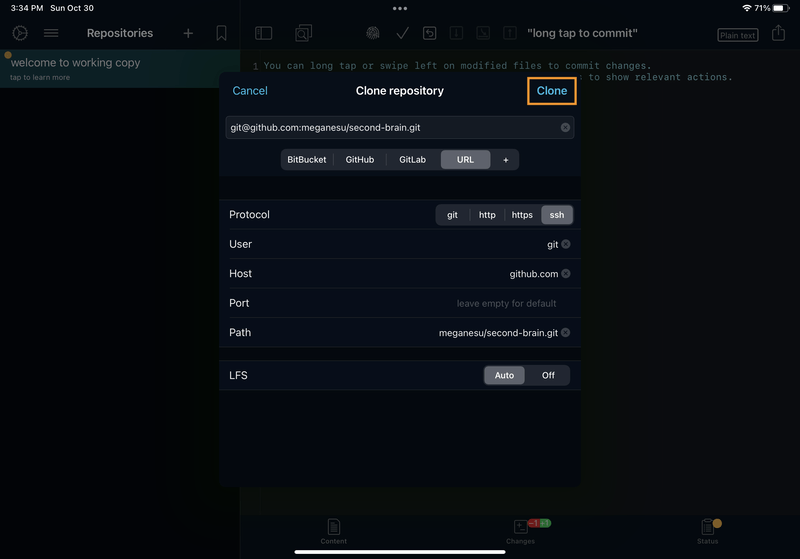
-
When you're done, you should see the contents of your vault repo in Working Copy.
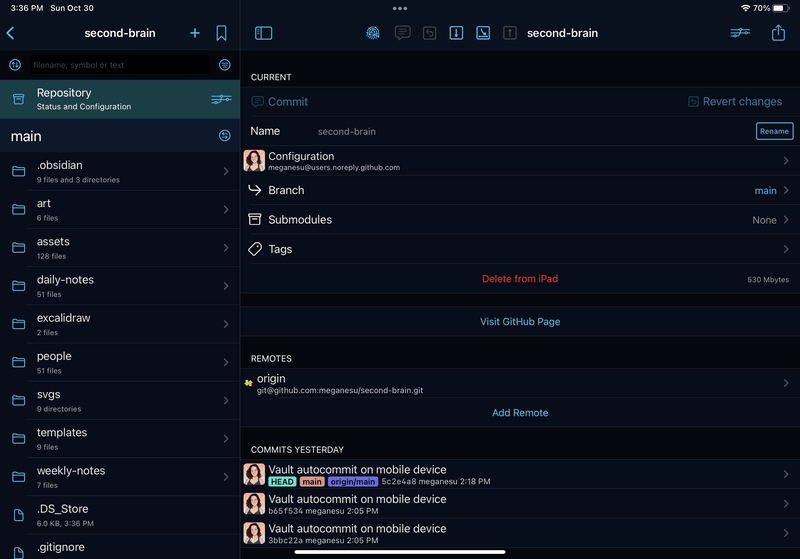
-
Click the share icon (the up arrow coming out of a box) on the right, then select "Link Repository to Folder".
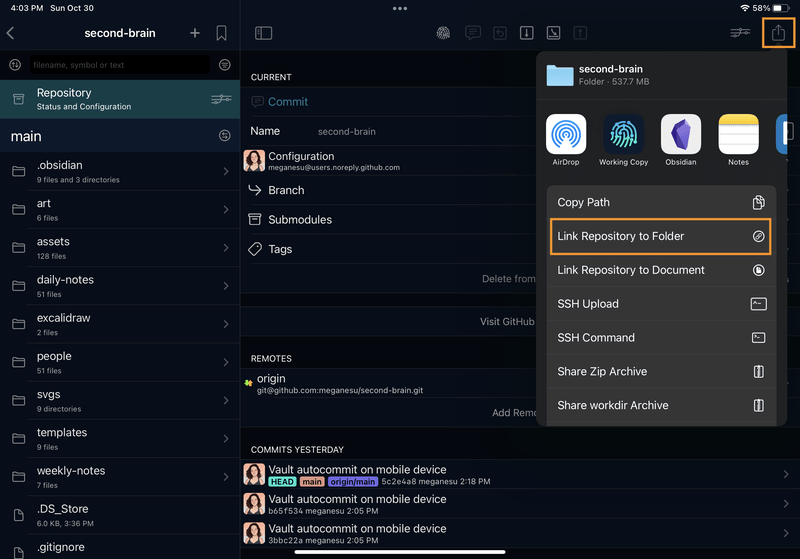
-
Under the "On My iPad" folder, open the "Obsidian" directory, and then select the folder for the new vault you created earlier. Then click "Done". This tells Working Copy to store the local copy of your repo in your Obsidian vault folder.
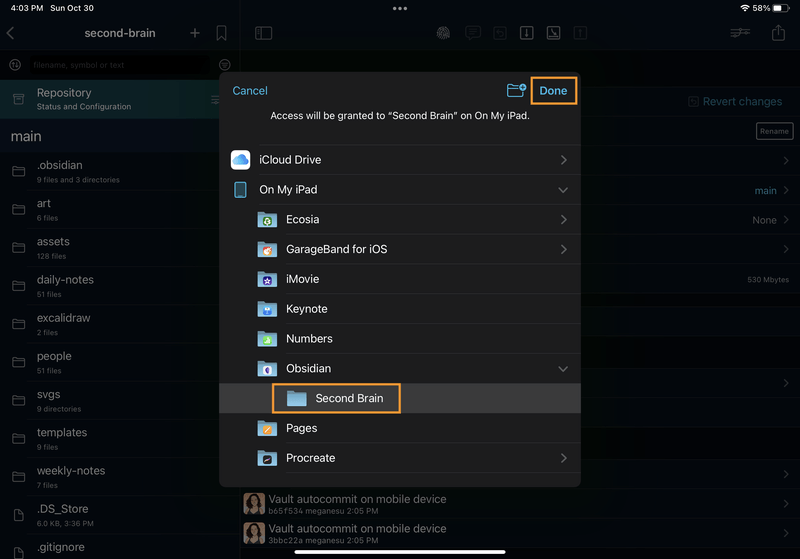
-
Back in Obsidian, validate that the files from your existing remote vault now appear in your new vault.
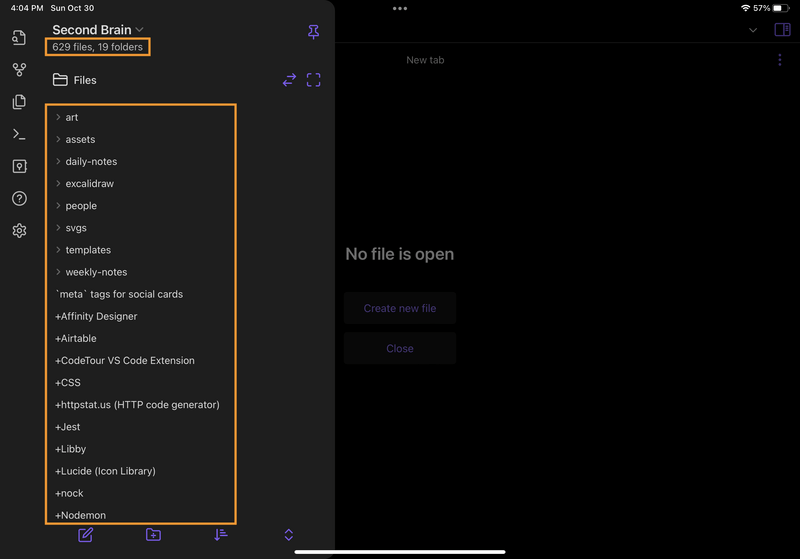
2) Pull changes from GitHub into your local vault
Now that you've got your local vault set up, it's time to handle the first scenario from earlier: pulling changes from the remote vault repo into your local vault.
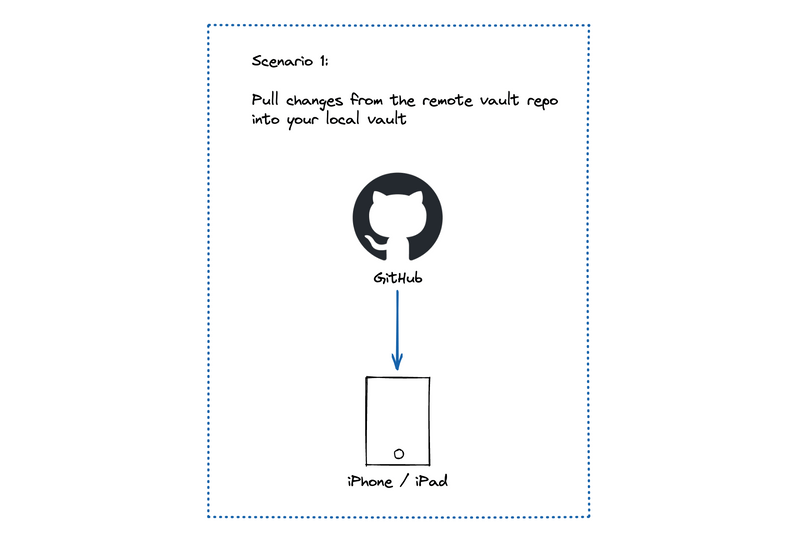
You'll do this work in two stages:
- Create a shortcut to pull changes.
- Automate the shortcut to run when the Obsidian app opens.
Create a shortcut to pull changes
-
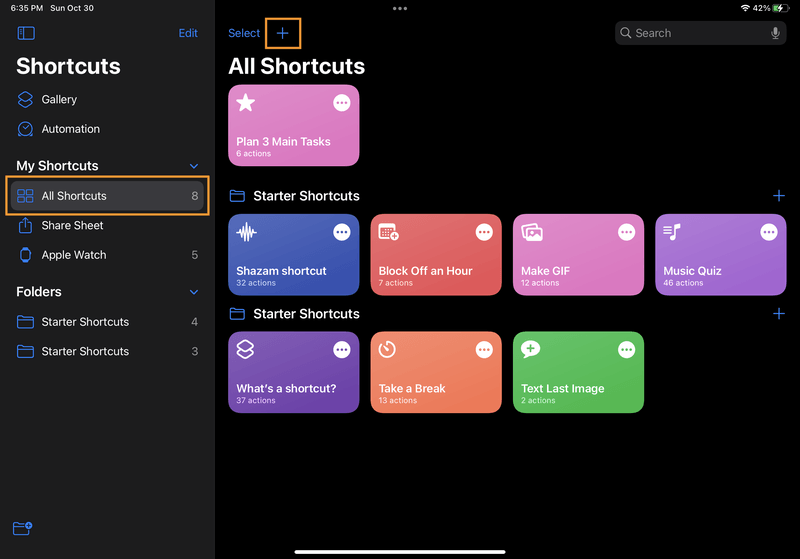
Open the Shortcuts app, and navigate to the "All Shortcuts" page. Click the "+" icon to create a new shortcut.
-
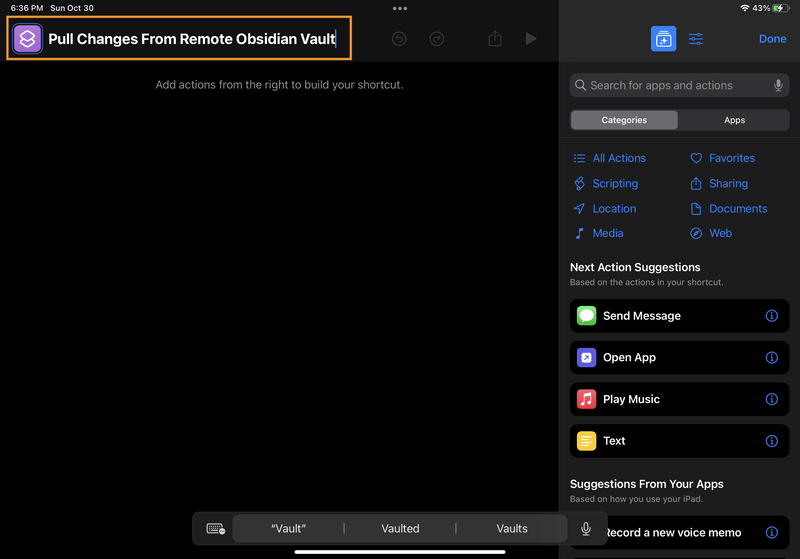
Name your new shortcut "Pull Changes From Remote Obsidian Vault".
-
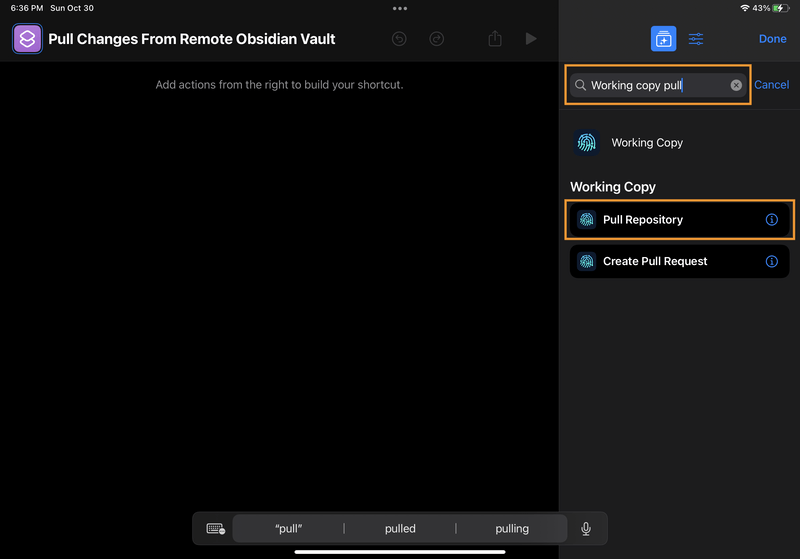
Use the search bar to find the Working Copy action to "Pull Repository". Tap the action to add it to your shortcut.
-
Checkpoint: So far, your shortcut should look like this:
![iPad screenshot of Shortcuts. The new shortcut has one action, "Pull from [Repository] remote". The word "Repository" is clickable. iPad screenshot of Shortcuts. The new shortcut has one action, "Pull from [Repository] remote". The word "Repository" is clickable.](/static/7eed81fccbbc57cac4dd08151af66e85/78d47/2-shortcut-04-add-pull-action.png)
-
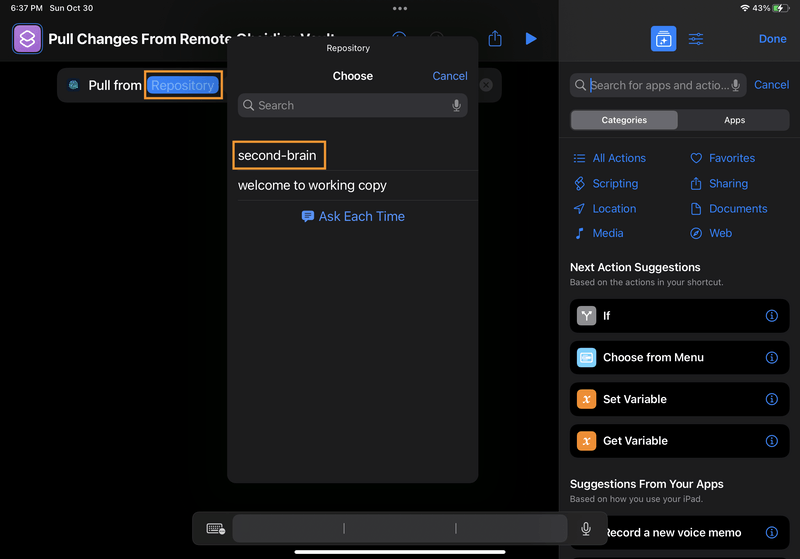
Tap on the "Repository" placeholder to fill in a value. Choose your vault repo from the list of Working Copy repos.
-
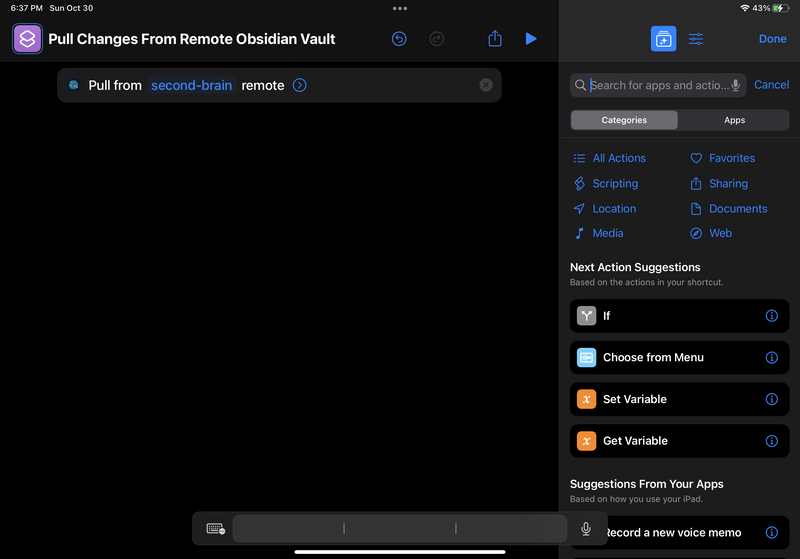
Checkpoint: Your final shortcut should look like the one below. Click "Done" to save your changes.
-
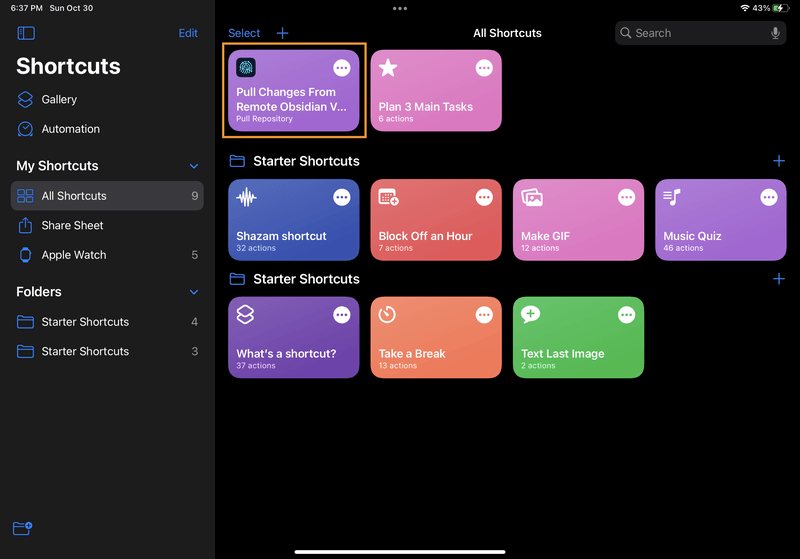
Now you have a shortcut that you can trigger by tapping it in the Shortcuts menu. (To edit your shortcut, click on the three dots in the corner of the grid item.)
Automate the shortcut to run when the Obsidian app opens
Now that you can pull updates from GitHub into your local vault, it's time to set up an automation to run that shortcut automatically! To avoid merge conflicts, pull changes from the remote repo every time you open the Obsidian app on your device. Let's set that up:
-
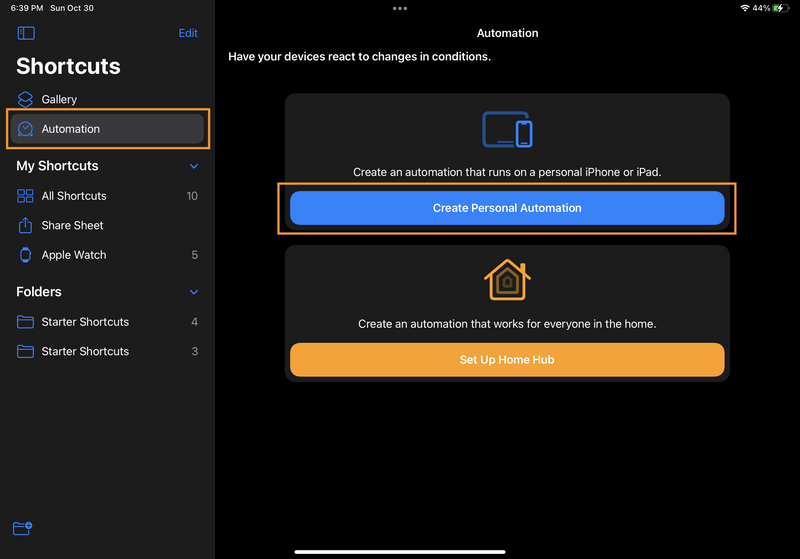
In the Shortcuts app, open the Automation page, and create a new personal automation.
-
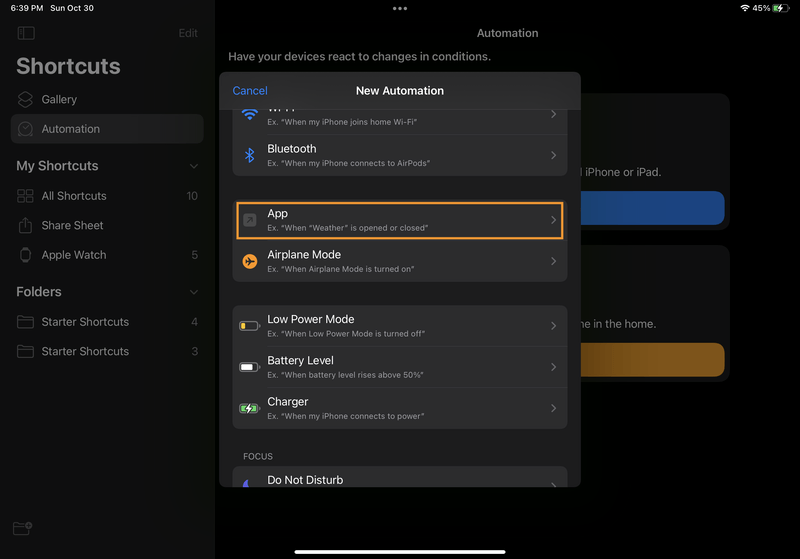
In the "New Automation" menu, choose the event that you want to trigger your automation. Scroll down and select "App".
-
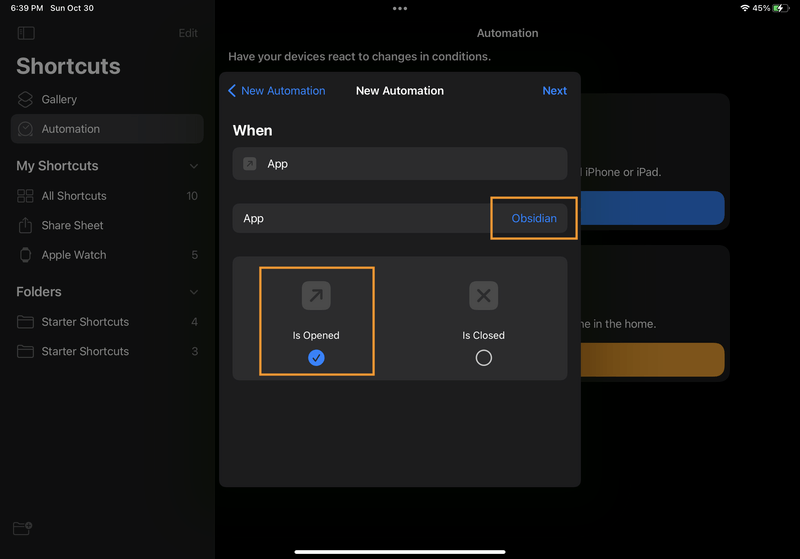
Choose "Obsidian" for the App, and make sure "Is Opened" is checked. Then click "Next".
-
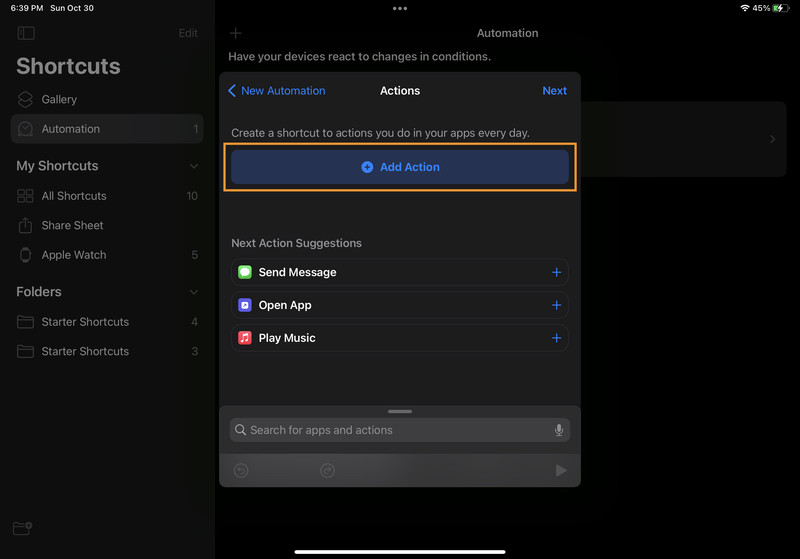
Now you'll set up the action you want to trigger when Obsidian is opened. Click the "Add Action" button.
-
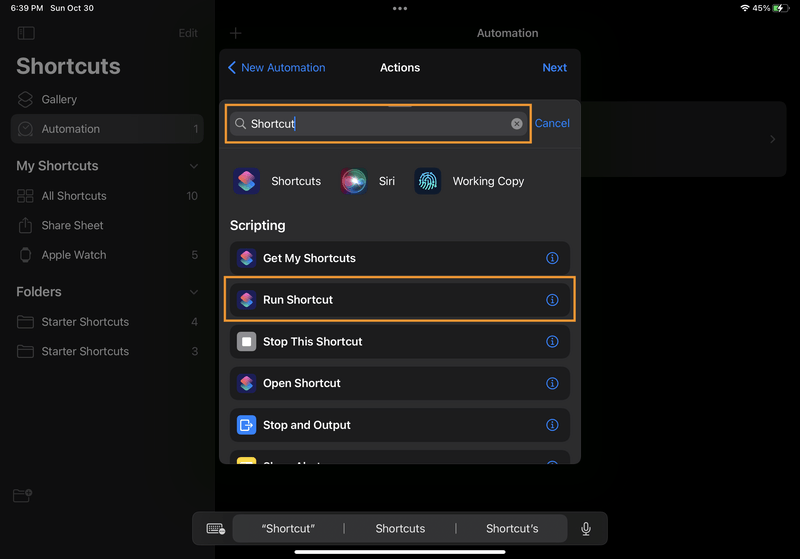
Use the search bar to find the "Run Shortcut" action. Click it to add it to your automation.
-
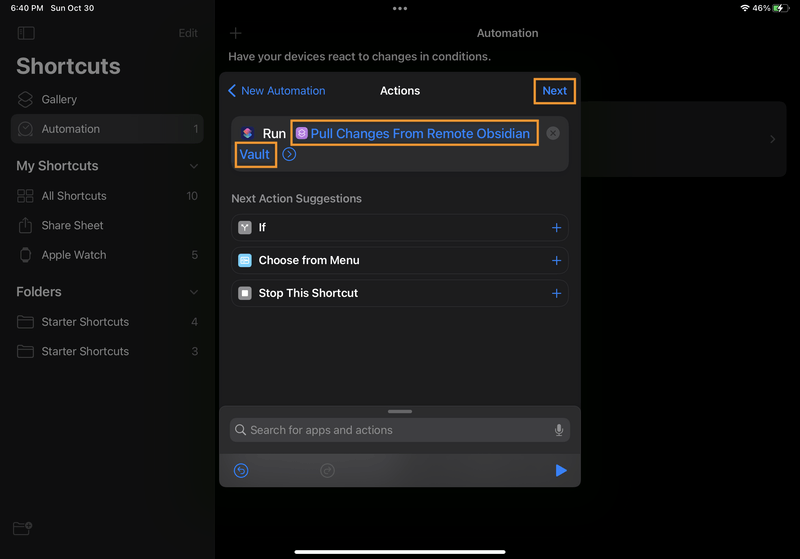
Click the "Shortcut" placeholder to fill in a value. Select the "Pull Changes From Remote Obsidian Vault" shortcut you created earlier. Then click "Next".
-
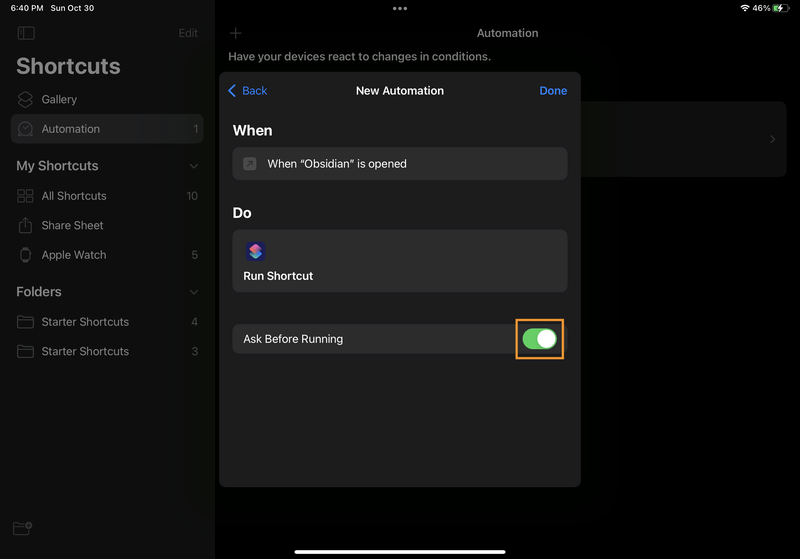
Review your automation settings. Turn off the "Ask Before Running" setting, so that you won't need to confirm the automation every time it runs.
-
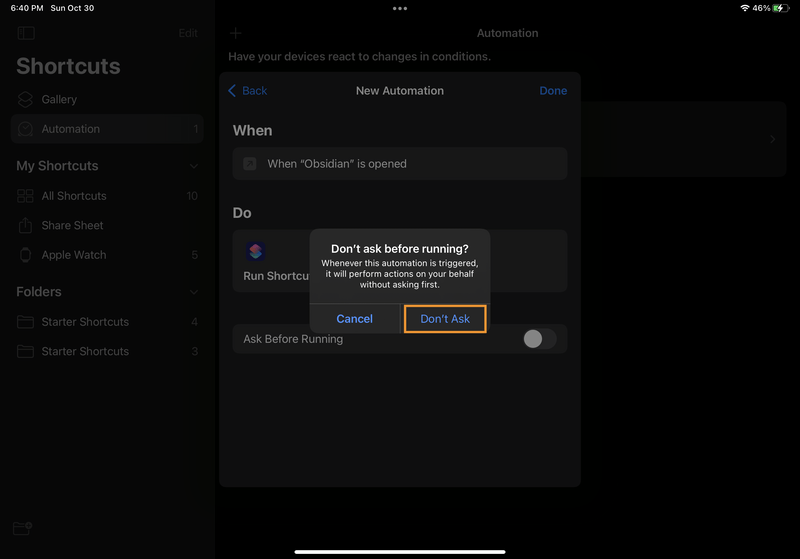
Turning off the "Ask Before Running" setting will require a second confirmation that you really don't want to ask before running the automation. Confirm by selecting "Don't Ask".
-
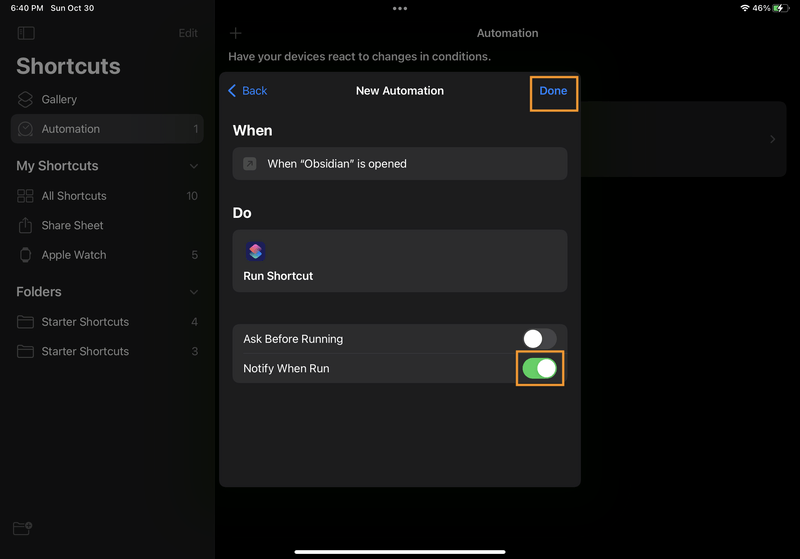
Now you should see an additional setting, "Notify When Run". Turn that setting on, so that you'll get a notification whenever your automation is run. (This will help you validate that the automation is working as expected. You can turn this setting off later if you'd prefer not to see a notification every time you open the app.)
Click "Done" to save your changes.
-
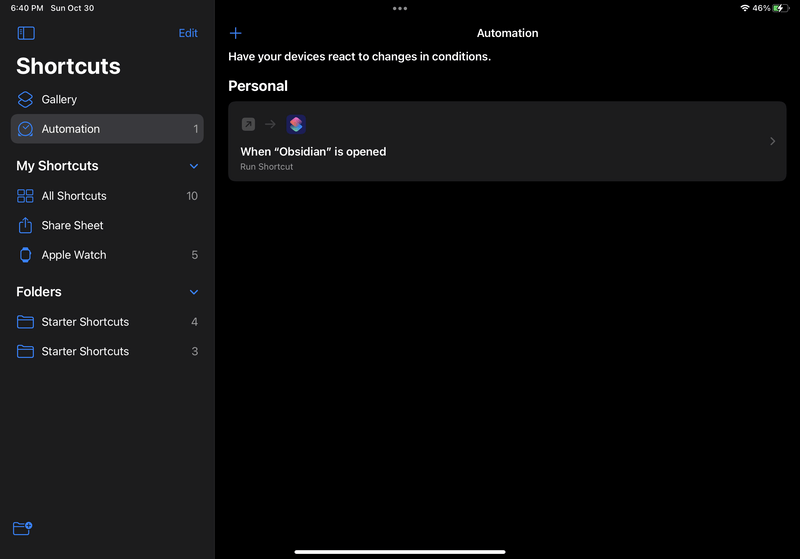
Your new automation should appear under "Personal" on the Automation page.
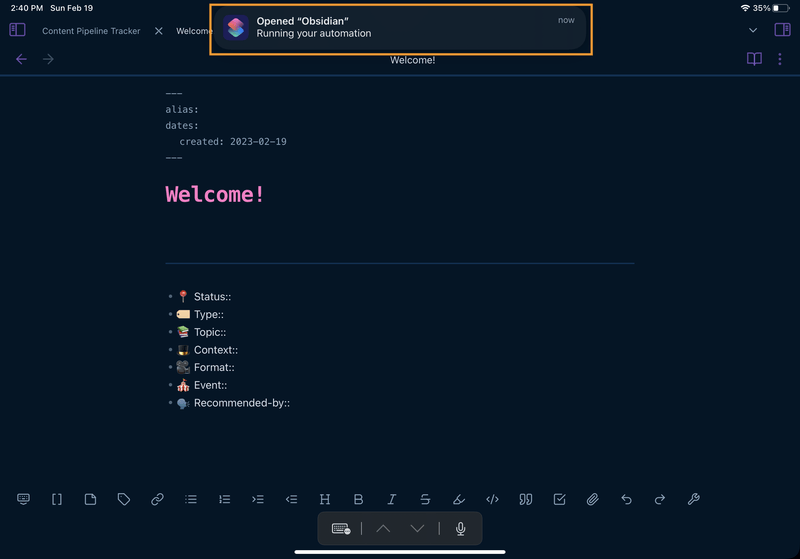
And that should do it! Test out your automation by opening the Obsidian app. You should see a notification telling you that your "Opened Obsidian" shortcut was run.
3) Push changes from your local vault to GitHub
Now you're ready to tackle the second scenario: pushing changes from your local vault into the remote repo on GitHub.
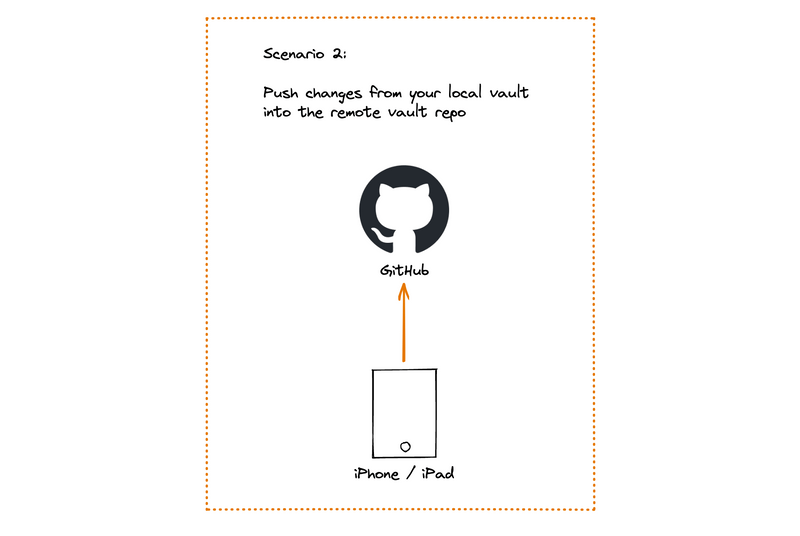
Like before, you'll do this work in two stages:
- Create a shortcut to push local changes.
- Automate the shortcut to run when the Obsidian app closes.
Create a shortcut to push local changes
-
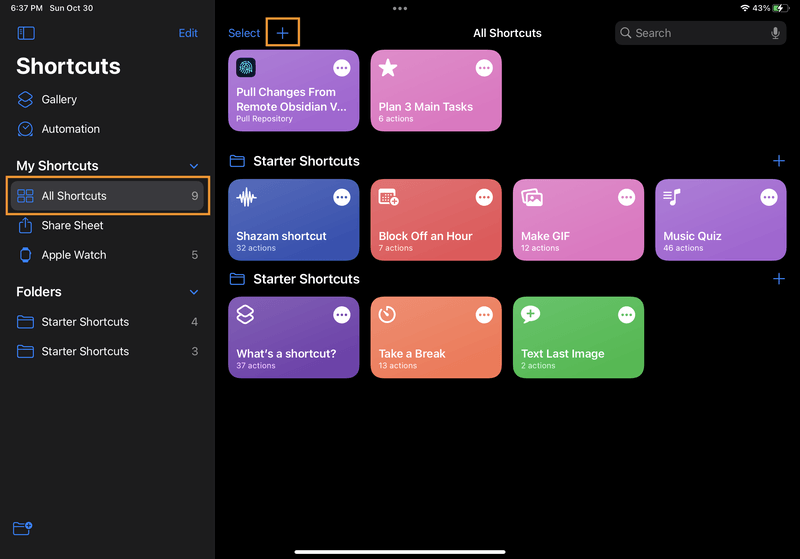
In the Shortcuts app, navigate back to the "All Shortcuts" page. Click the "+" icon to create a new shortcut.
-
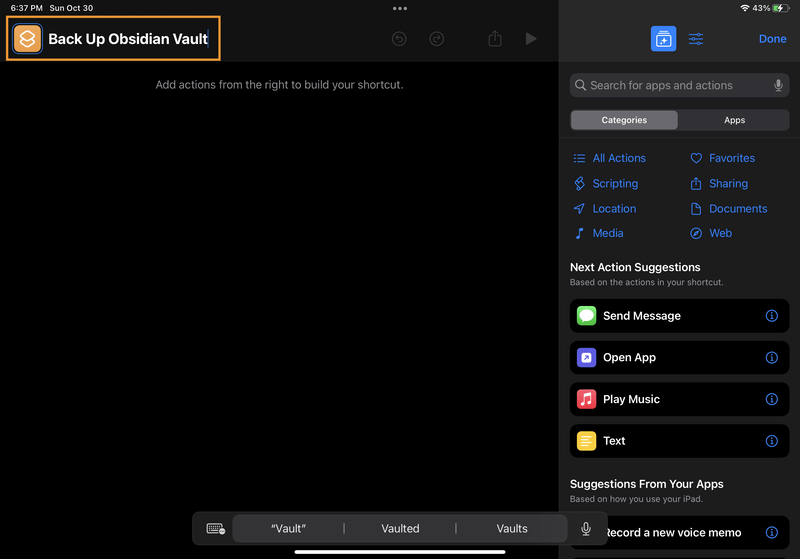
Name your shortcut "Back Up Obsidian Vault".
-
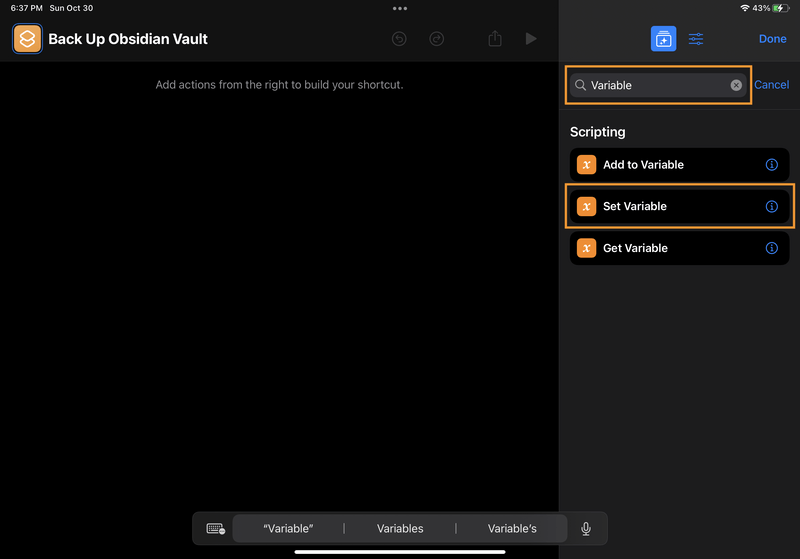
If you plan on running these shortcuts across multiple devices, it helps to specify in your commit message which device you're making changes from. (For example, I use the free iCloud tier to sync my Shortcuts across Apple devices, so this shortcut could run from either my iPad or my iPhone. Knowing which device a commit came from helps me troubleshoot if something goes wrong or I start getting merge conflicts.)
To set that up, use the search bar to find the Scripting action called "Set Variable". Tap the action to add it to your shortcut.
-
Checkpoint: Now your shortcut should look like this:
![iPad screenshot of Shortcuts. The new shortcut has a single action, called "Set variable [Variable Name] to [Input]". "Variable Name" and "Input" are both clickable placeholder values. iPad screenshot of Shortcuts. The new shortcut has a single action, called "Set variable [Variable Name] to [Input]". "Variable Name" and "Input" are both clickable placeholder values.](/static/d855e694b71d7e4aa9f9935d26b2355d/78d47/3-shortcut-04-set-variable.png)
-
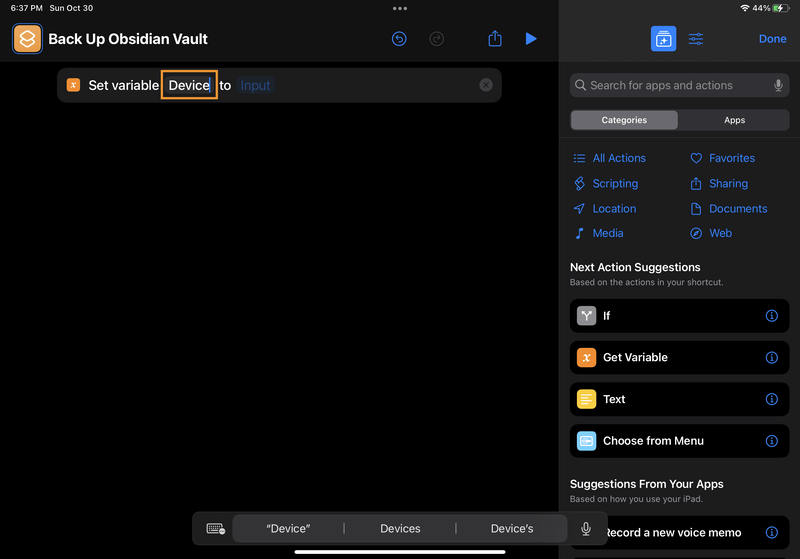
Give your variable a name by tapping on "Variable Name". You can call this whatever you want; I called mine "Device".
-
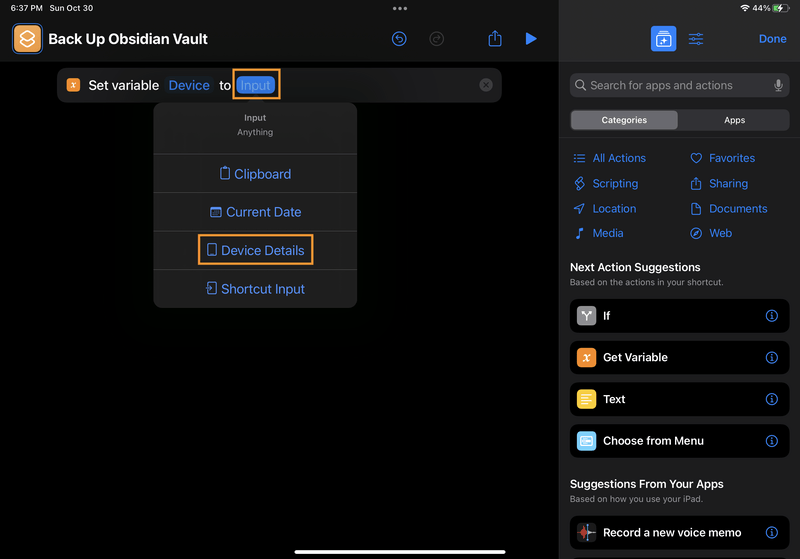
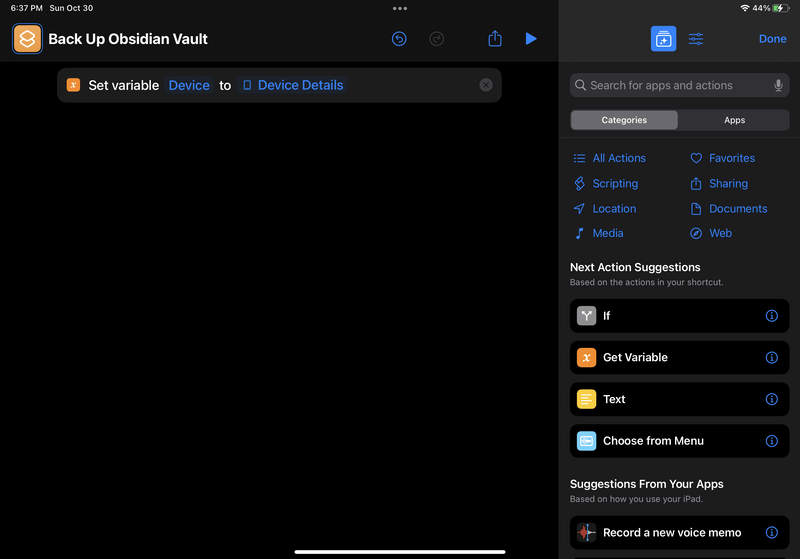
Now set the value of your variable by tapping "Input" and choosing "Device Details".
-
Checkpoint: This is what your action should look like so far:
-
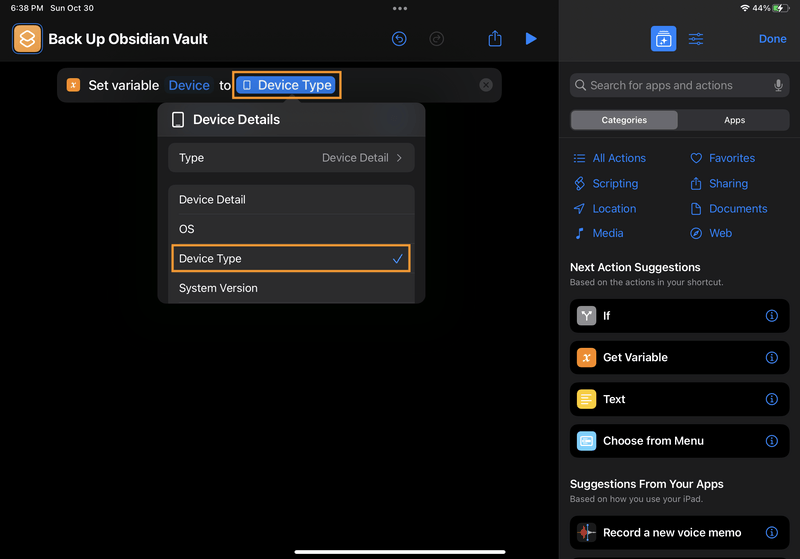
Tap on "Device Details", and scroll down to select "Device Type". When your shortcut runs, this value will be something like "iPhone" or "iPad", depending on what kind of device you're using.
-
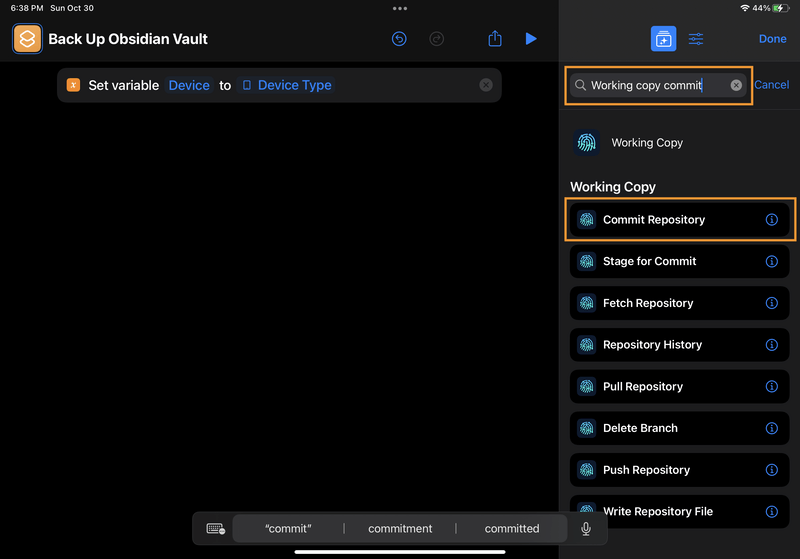
Use the search bar to find the Working Copy action called "Commit Repository". Tap the action to add it to your shortcut.
-
Checkpoint: Now your shortcut should look like this:
![iPad screenshot of Shortcuts. At the bottom of the actions list, there's a new action: "Commit [Repository] with [Message]". "Repository" and "Message" are clickable placeholder values. iPad screenshot of Shortcuts. At the bottom of the actions list, there's a new action: "Commit [Repository] with [Message]". "Repository" and "Message" are clickable placeholder values.](/static/1b420e21fd4429bf6141473c0d0c09ab/78d47/3-shortcut-10-add-commit-action.png)
-
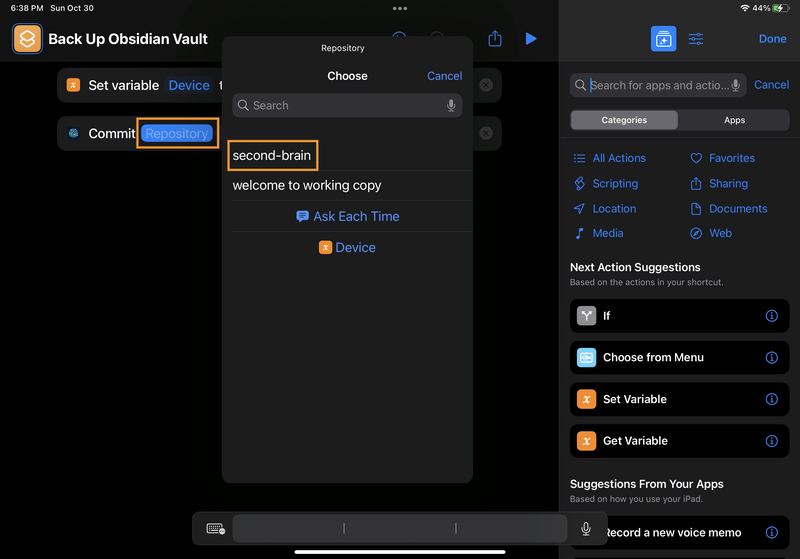
Tap "Repository" to fill in a value for which Working Copy repo you want to commit to. Choose your vault repo from the menu.
-
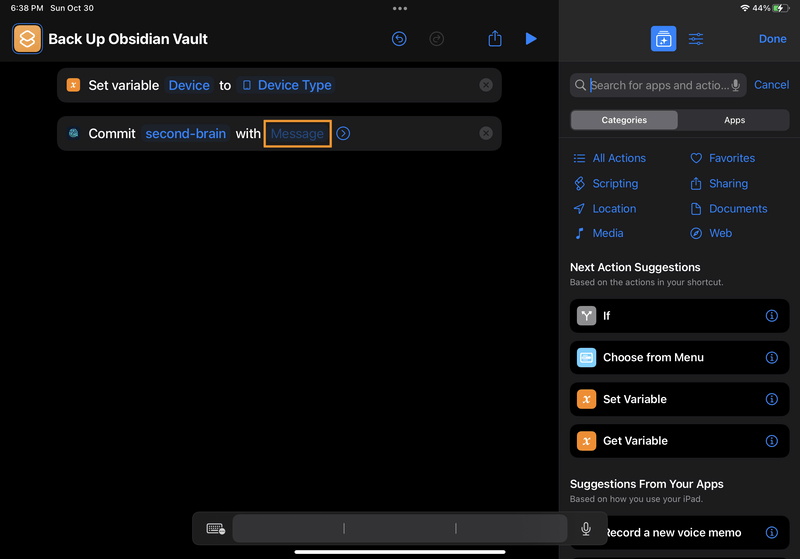
Next, tap "Message" to fill in what you want your commit message to be.
-
You can use the menu at the bottom of the screen to add the Device variable into your commit message. I set my commit message to: "Vault autocommit on <Device>" (which will end up being either "Vault autocommit on iPad" or "Vault autocommit on iPhone", depending on which device I'm using).
![iPad screenshot of Shortcuts. The "Message" placeholder has been replaced with, "Vault autocommit on [Device]", where "Device" is the value of the Device variable. At the bottom of the screen, there's a menu where users can select a variable to insert into the message string. iPad screenshot of Shortcuts. The "Message" placeholder has been replaced with, "Vault autocommit on [Device]", where "Device" is the value of the Device variable. At the bottom of the screen, there's a menu where users can select a variable to insert into the message string.](/static/cb30e981ae24abd5bf2a58a20118eb0e/78d47/3-shortcut-13-commit-message.png)
-
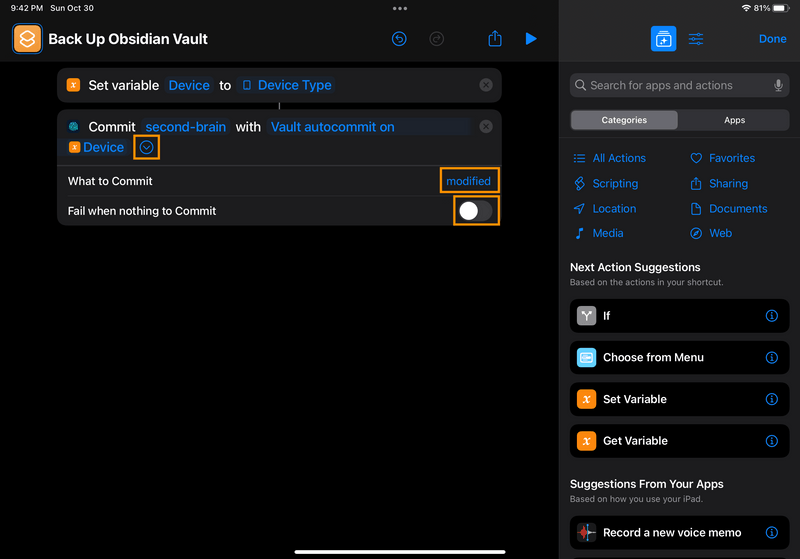
Click the arrow icon in the commit action to expand the advanced options menu.
- Set the "What to Commit" option to "modified".
- Turn off the "Fail when nothing to Commit" toggle.
-
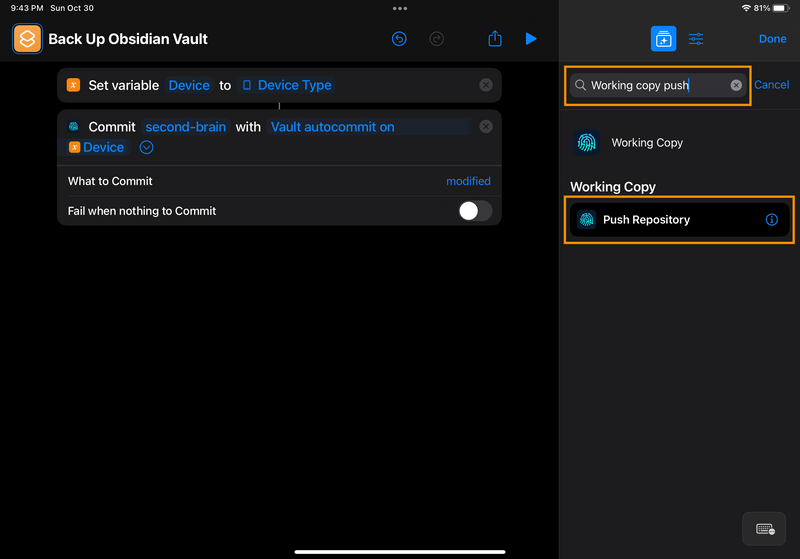
Use the search bar to find the Working Copy action called "Push Repository". Tap the action to add it to your shortcut.
-
Checkpoint: Now your shortcut should look like this:
![iPad screenshot of Shortcuts. The new shortcut's list of actions shows a new action at the bottom: "Push [Repository] to remote". The word "Repository" is a clickable placeholder. iPad screenshot of Shortcuts. The new shortcut's list of actions shows a new action at the bottom: "Push [Repository] to remote". The word "Repository" is a clickable placeholder.](/static/5dabe7f25d82c3571df2fcbc8177b57d/78d47/3-shortcut-16-add-push-repo-action.png)
-
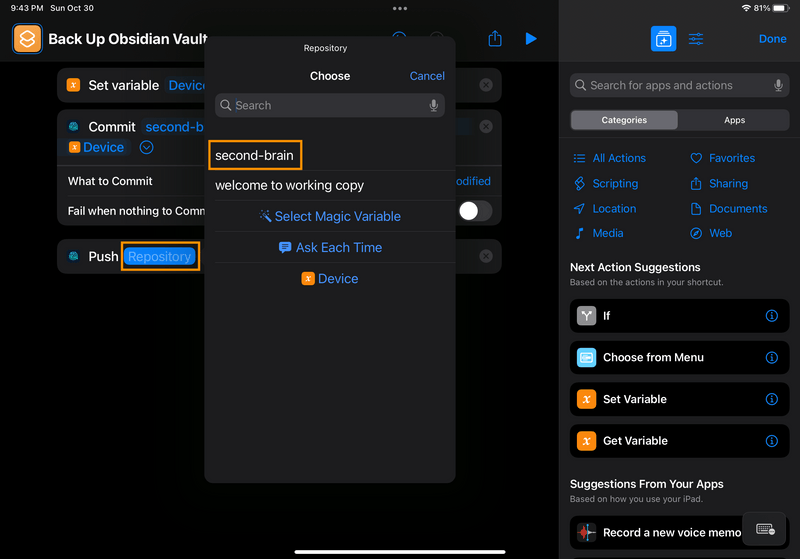
Tap "Repository" to fill in a value for which Working Copy repo to push to its remote. Select your vault repo from the menu.
-
Your final "Back Up Obsidian Vault" shortcut should look like this:
![iPad screenshot of Shortcuts. The actions list for the new shortcut contains the following actions: "Set variable [Device] to [Device Type]." "Commit [second-brain] with [Vault autocommit on Device]." "Push [second-brain] to remote." iPad screenshot of Shortcuts. The actions list for the new shortcut contains the following actions: "Set variable [Device] to [Device Type]." "Commit [second-brain] with [Vault autocommit on Device]." "Push [second-brain] to remote."](/static/e5c28ed1bdefdd96227463b92b9186a1/78d47/3-shortcut-18-final.png)
-
Click "Done" to save your new shortcut. You should now see it appear on the "All Shortcuts" page. Tap the shortcut to run it. (To edit your shortcut, click on the three dots in the corner of the grid item.)
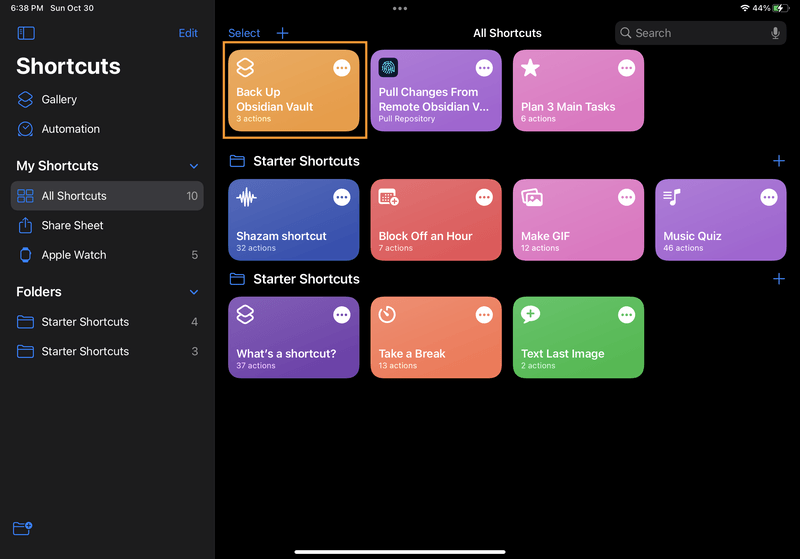
Automate the shortcut to run when the Obsidian app closes
Now that your shortcut is set up, it's time to automate it! To make sure your latest changes are always pushed up to the remote repo, run your shortcut every time you close the Obsidian app. Let's set that up next:
-
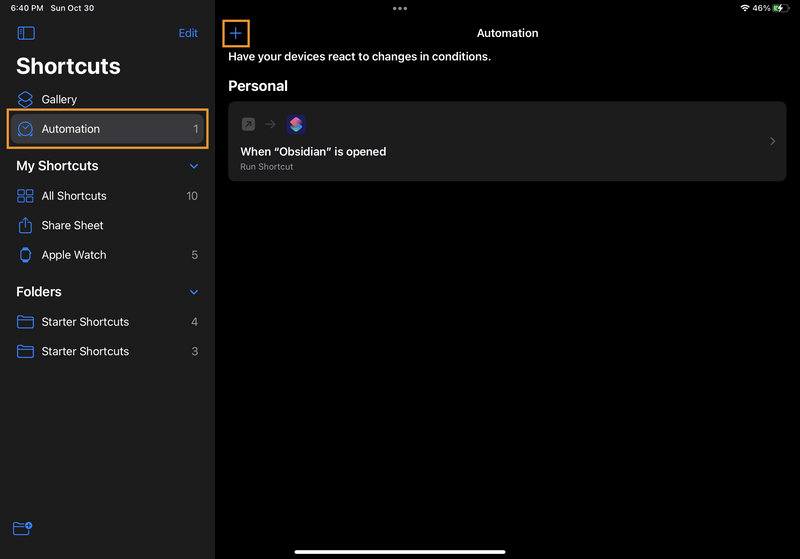
In the Shortcuts app, navigate to the "Automation" page. Click the "+" icon to create a new automation.
-
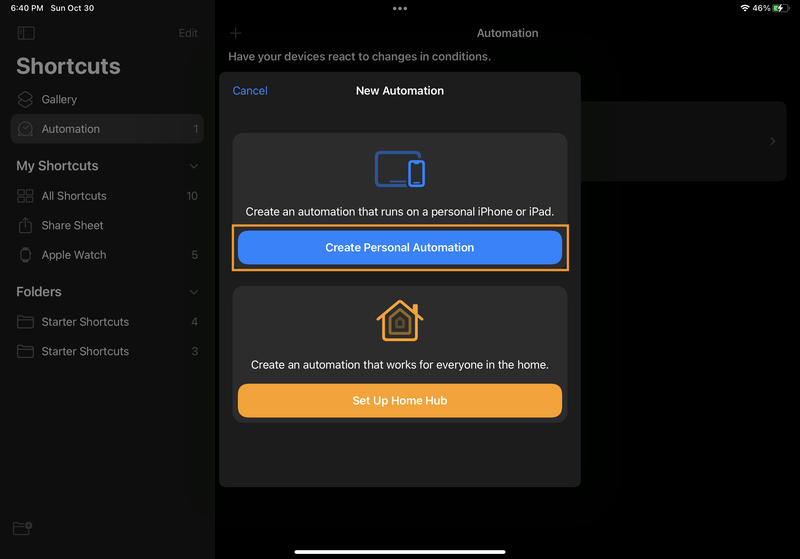
Choose "Create Personal Automation".
-
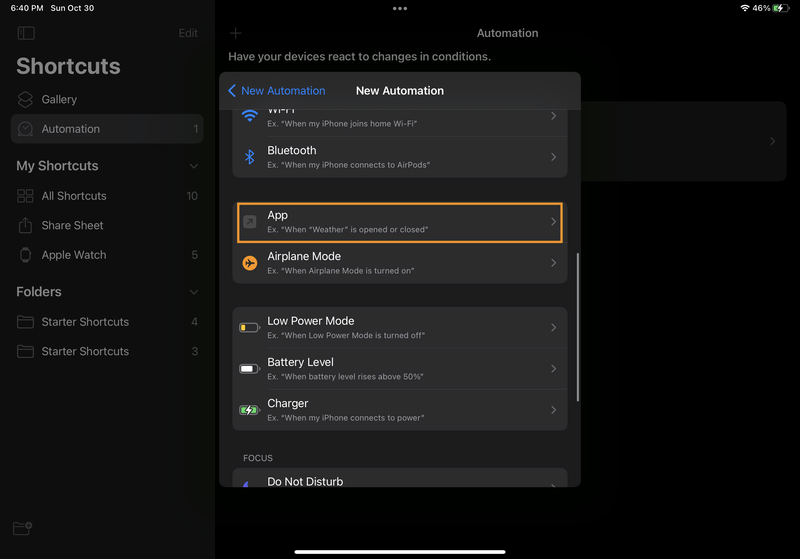
Next, choose which event you want to trigger your automation. Scroll down and select "App".
-
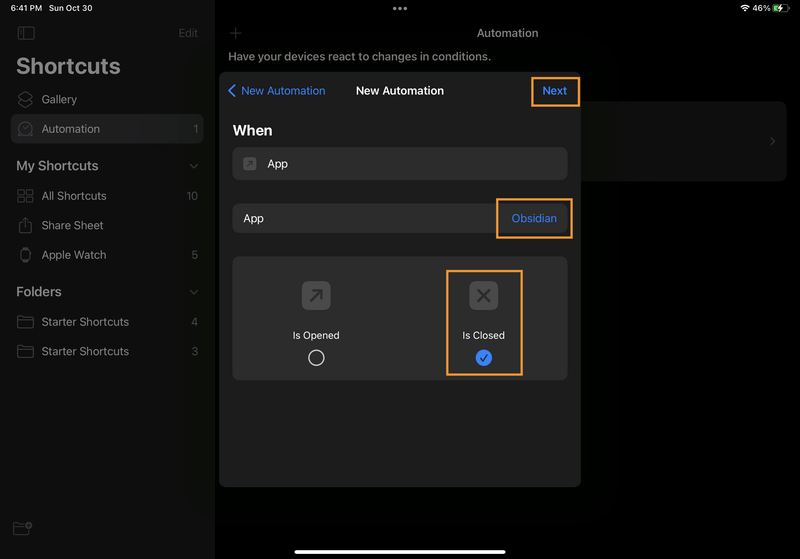
For "App", choose Obsidian. Uncheck the "Is Opened" toggle, and check "Is Closed" instead. Then click "Next".
-
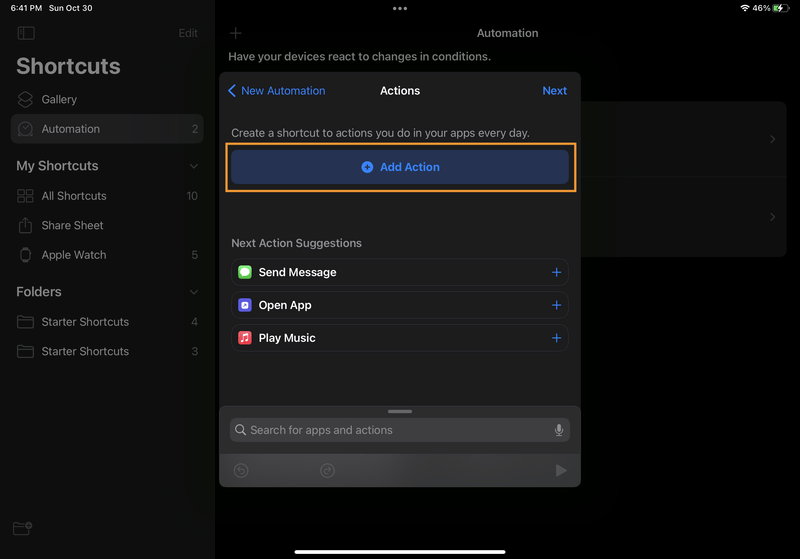
Now it's time to specify what action you want to run when your automation is triggered. Click the "Add Action" button.
-
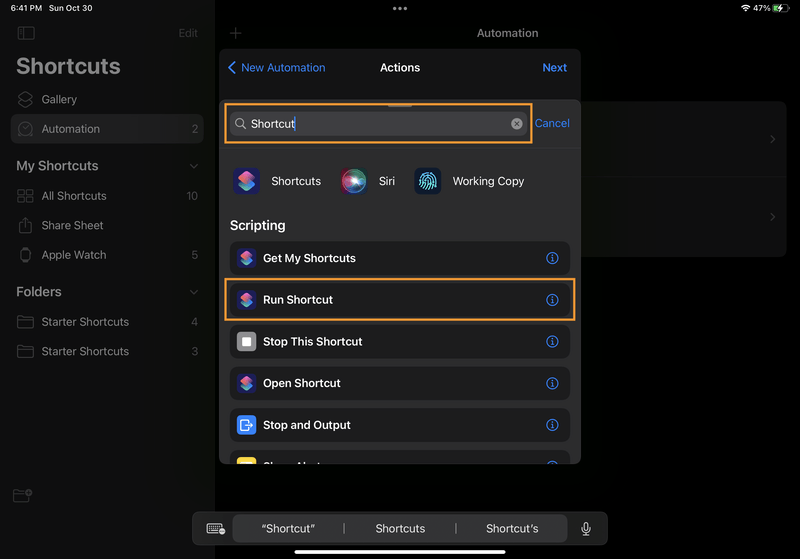
Use the search bar to find the "Run Shortcut" action. Tap the action to add it to your automation.
-
Tap the "Shortcut" placeholder to add in a value.
![iPad screenshot of Shortcuts. In the "Actions" modal, there's an action listed called "Run [Shortcut]", where "Shortcut" is a clickable placeholder. iPad screenshot of Shortcuts. In the "Actions" modal, there's an action listed called "Run [Shortcut]", where "Shortcut" is a clickable placeholder.](/static/30e6ca2ea7aad6130fafdf4c7e357a69/78d47/3-automate-07-shortcut-variable.png)
-
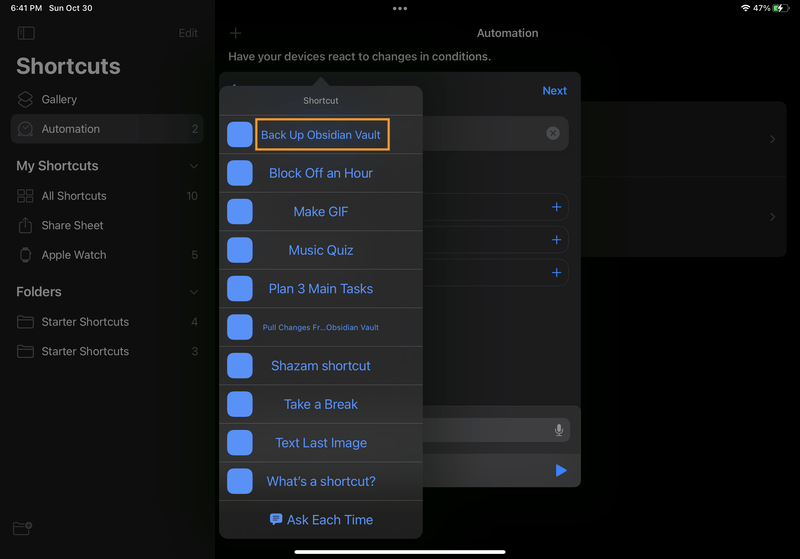
Select your "Back Up Obsidian Vault" shortcut from the menu.
-
Checkpoint: Your actions should look like this. Click "Next" to continue.
![iPad screenshot of Shortcuts. In the "Actions" modal, there's a single action listed: "Run [Back Up Obsidian Vault]". iPad screenshot of Shortcuts. In the "Actions" modal, there's a single action listed: "Run [Back Up Obsidian Vault]".](/static/d486a7b488037a23b45902c044f3de78/78d47/3-automate-09-checkpoint.png)
-
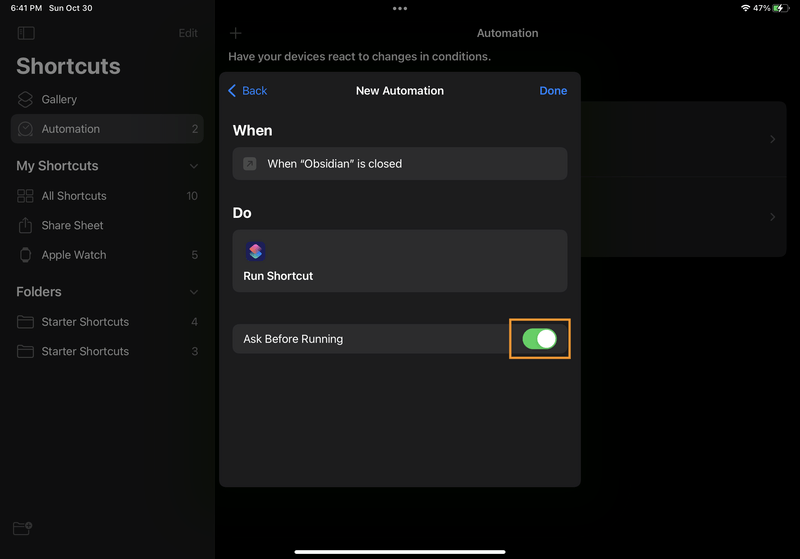
Review your automation settings. Turn off the "Ask Before Running" setting, so that you won't need to confirm the automation every time it runs.
-
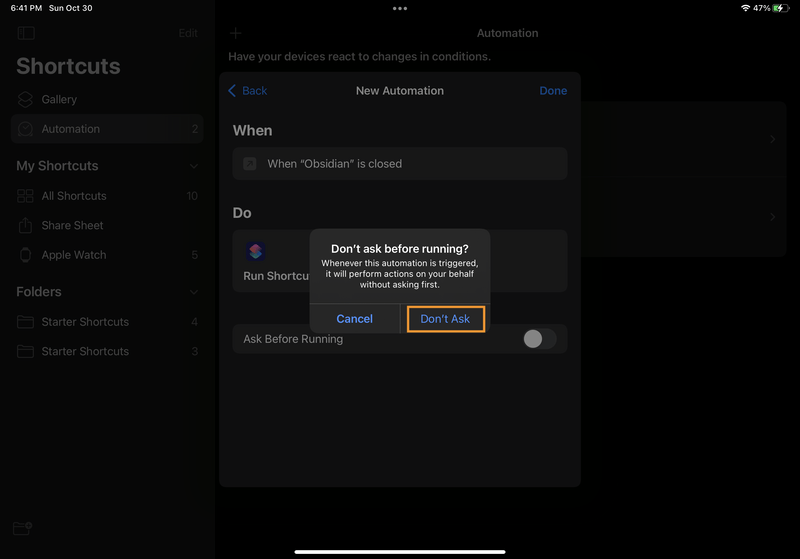
Turning off the "Ask Before Running" setting will require a second confirmation that you really don't want to ask before running the automation. Confirm by selecting "Don't Ask".
-
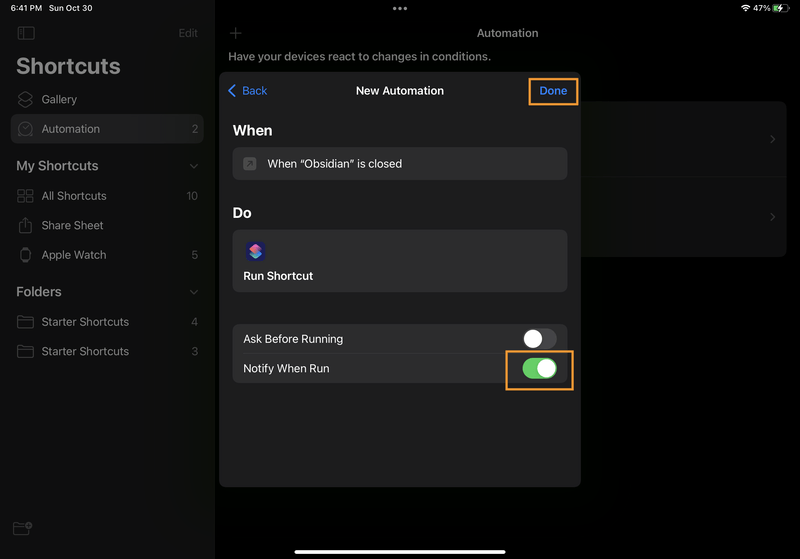
Now you should see an additional setting, "Notify When Run". Turn that setting on, so that you'll get a notification whenever your automation is run. (This will help you validate that the automation is working as expected. You can turn this setting off later if you'd prefer not to see a notification every time you close Obsidian.)
-
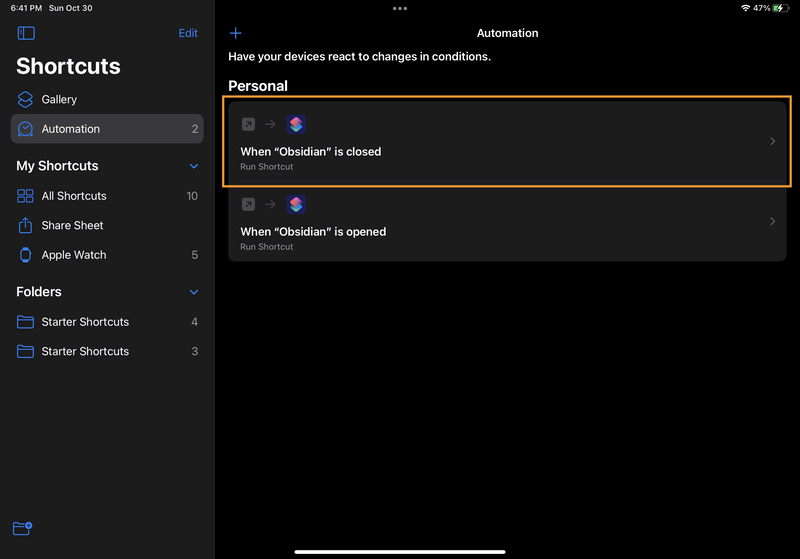
Click "Done" to save your changes. Your new automation should appear under "Personal" on the Automation page.
And you're done!
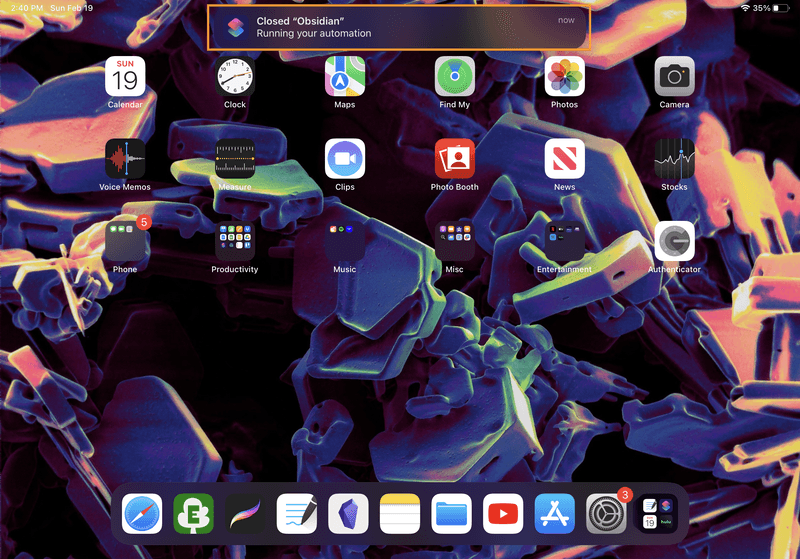
Test out your new automation by opening the Obsidian app (which triggers a notification that your "Opened Obsidian" automation is running), making some changes, and then closing the Obsidian app (by going back to your home screen). You should see a notification that your "Closed Obsidian" automation ran.
Wrap It Up
Obsidian has become a huge part of my day-to-day workflow. By syncing my vault across all my devices, I have the flexibility to capture notes on whichever device I have on hand.
Want to learn how to make the most of your new note-taking freedom? I've learned a ton about Obsidian by watching Ben Hong's YouTube channel, BenCodeZen. You can also check out the official Obsidian Community page, which has links to a dedicated Discord server and online forum.
If you like this post, reach out on Mastodon and let me know! You can also subscribe to my newsletter (below) to get updates when I post new content.
Resources
- Obsidian on the App Store
- Working Copy on the App Store
- Shortcuts on the App Store
- Apple Support: Shortcuts User Guide
- Apple Support: Setting triggers in Shortcuts on iPhone or iPad
This tutorial was inspired by the following resources:
Join the newsletter!
Subscribe to get email updates about new content! (No spam. Unsubscribe at any time.)
